When a weight’s value changes, the WPs are faded in and out, depending on a number of factors. The basic rules are:
a WP is 0 when the weight is 0
a WP is 1 when the weight has the value of the WP’s position
a WP is 0 when the weight has the value of another WP’s position, provided this other WP is visible to the WP in question
The conditional in the final rule allows inbetween dataPoints to behave relative to the main movement the plain dataPoint creates, which is a very useful feature for a similar reason that relative combination dataPoints are handy.
Layers in Detail
WeightPosition Layers are a means of controlling which WPs can see which. The rule is:
A WP can “see” all other WPs on the same or lower (i.e. smaller number) layer.
So a WP on layer 1 can see WPs on layers 0 and 1 but not those on layer 2 or higher.
Hint As a rule of thumb, always have inbetween weightPositions on layer 1 or higher. The layer of the WP at a weight’s value 1 should be 0. |
WeightPosition Layers allow you to define a hierarchy between different weightPositions of one weight. DataPoints placed at a wPos on layer 1 or higher are relative to dataPoints placed on a layer 0 wPos.
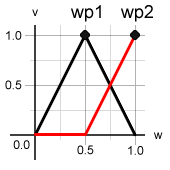
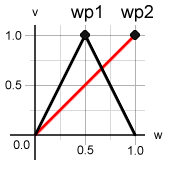
The following diagrams show how layers change the way in which weightPositions are interpolated. (Note that in this example, the weightPositions have linear interpolation for simplicity’s sake.)
|
The w axis is the value of the weight. The v axis is the wPos
value. Both images show a setup with two weightPositions. The first
(wp1) is at the weight’s value 0.5. The wp2 is at the
weight’s value 1. Let’s assume we have placed a dataPoint at each wPos. The
wp2 dataPoint is the plain dataPoint of the weight. As you can see,
there are two graphs. The red one is the value of the wp2
weightPosition and the black shows the wp1 value.
In the first image, both weightPositions are on layer 0. You can see that
both weightPositions are 0 at the weight’s 0 value and 1 at their own
position. Their curves are also 0 at the position of any other
weightPosition they can see. Since
WPs can see all other WPs on the same or (numerically) lower layer,
wp1 sees wp2 and thus is 0 at the weight value
1. wp2 on the other hand is 0 at wp1.
The second image shows almost the same situation. The difference is that wp1
is on layer 1. This means that wp2 cannot see it and behaves as if it
was the only wPos of the weight. wp1 is the same as in the first
image, since it can see wp2.
Why do we need this?
There are three reasons for placing a wPos on a higher layer:
You might want the inbetween dataPoint at
wp1to just correct the movement of the plain dataPoint atwp2. This can be very useful when the inbetween dataPoint is relative and you change the plain dataPoint. Let’s say you have an inbetween that creates an arced movement when closing the eye. If you now decide to tweak the closed eye, the inbetween will inherit the changes to 50%, so that the movement is still correct.Combination dataPoints that use
wp2can exist on their own and you don’t need another combination withwp1. Ifwp1was on layer 0, a combination withwp2would come into play only when the weight reaches values above 0.5. Another combination withwp1would be needed. Placingwp1on layer 1 will makewp2behave as if it was alone, so that combinations with it behave correctly.Certain interpolations only work correctly when used on a sub-layer. E.g. the arc interpolation requires the wPos to be on layer 1 (or higher).

