This script allows you to paint with artisan to smooth the deltas of vertex positions between two polygonal objects. The result is that the local structure of vertices will be reconstructed without moving them to their original place.
This is useful when modeling targets for Blend Shapes or BCS dataPoint geometry. When you’ve modeled a target, this tool can make the vertices surrounding the main deformation area follow slightly, creating a nice falloff of the deformation in seconds. The script can also be used to copy absolute vertex positions, like painting a Blend Shape (but without any additional nodes).
Example: Structure Copy
I’ll use the following images to demonstrate the tool with a simple example:
|
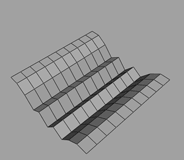
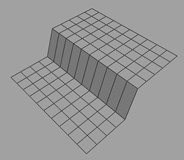
Let’s say you have modeled the planes A and B. Now you want the
structure of A on certain regions of B, but without loosing the
height of the top area. This can be done with the Paint Deform tool
by smoothing the deltas between A and B when you paint on
B.
Example: Easy Deformation Falloff
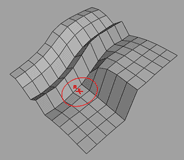
And now an example of a deformation falloff that was created in a few seconds.
|


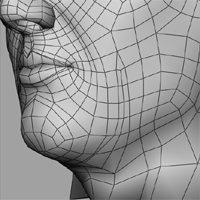
In the first image you clearly see that the movement only affects the lower part of the jaw. What I now wanted to achieve was to ease out the deformation with sort of a falloff effect, so that distant vertices move slightly with the others to create a more organic looking effect.
The second image shows the result of using the “Edit Polygons->Sculpt Geometry Tool” with the Smooth operation selected. This has a similar effect as the “Polygons->Average Vertices” command. The result is not ideal, as many vertices move out of their place. For example, look at the 5-edged vertex near the ear or the dense area from the nostril down to the outer part of the lips. They loose their structure and don’t move logically with the surrounding vertices.
The third image took approximately as long as the second, but the result is much more organic and harmonic vertex movement. It was created using the Paint Deform tool with the Smooth Deltas operation. The target object was the neutral face.
Since the structure is preserved, you can even use this tool on as complex areas as the ear, nose, eyes, or mouth corners.
Hint To quickly move an area with a nice falloff, select a few vertices and move them in the desired direction. Then, use Paint Deform to adjust the surrounding vertices. |