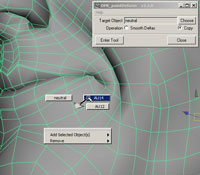
This marking menu allows you to quickly switch the Paint Deform Target Object. Here is an example where several objects have already been configured to appear in the menu:
When you choose any of these objects, it is loaded into the Paint Deform UI as target object and the paint tool is entered so that you can immediately start painting the structure.
The two items at the bottom of the menu will always appear and allow you to add and remove objects from this menu.
Opening the Menu
You can open the menu by pressing the left or right mouse button in the area between the Enter Tool and Close buttons.

You can also open the menu directly in the modeling pane (i.e., where you see the geometry in Maya). For this to work, you have to configure a hotkey so that you can open the menu in the pane itself. To set this up, follow these steps:
If you haven’t run
DPK_registerHotkeysyet, run the MEL commandDPK_paintDeformHotkeysto create just the PaintDeform Marking Menu commands for the Hotkey Editor.Open the Hotkey Editor (“Window->Settings/Preferences->Hotkeys…”) and select the User category.
In the Commands list, you should now find these two items:
DPK_UpperRadius_PaintDeformMM_PressDPK_UpperRadius_PaintDeformMM_Release
Select “
DPK_UpperRadius_PaintDeformMM_Press” and assign it the hotkey “b”. You will get a message saying that this key is already assigned toModifyUpperRadiusPress. The functionality of this old assignment is also provided by theDPK…command, so you can press “Assign” to override the old assignment without loosing its functionality. Another message will appear saying that the corresponding Release hotkey will be removed too. This is no problem, because we will assign it in the next step.Now, assign “b Release” to
DPK_UpperRadius_PaintDeformMM_Release. This is done by setting the Direction from Press to Release.
These settings are saved when you exit Maya, so that you don’t have to do this again.
As before, you can change the brush radius by holding down “b” and dragging with the left mouse button. To open the new PaintDeform Marking Menu, hold down “b” and press and hold the middle mouse button. The menu should appear in the modeling pane:
Adding Objects To The Menu
To add an object to the marking menu, follow these steps:
Select the object in the scene.
Open the menu and select “Add Selected Object(s)->North” or any other radial position from the sub-menu.
The object will then appear at the specified radial position in the menu the next time you open it.
Adding DataPoints To The Menu
When you’re editing a BCS setup, you will often want to select certain dataPoints as reference targets for the Paint Deform tool. To speed up the workflow, the bcsUI has a special menu item in the Data Points menu and DataPoint “Edit” Popup Menu.
The item
Add to PaintDeform Marking Menu
will create an independent object of the selected dataPoint and set it up
to appear in this PaintDeform Marking Menu. All objects created this way will
be made invisible and are put into the group “paintDeform_refObjGrp”.
Removing Objects From The Menu
To remove an object from the menu, you can either delete the object from the scene, or select “Remove->” followed by the object to remove from the marking menu. For example, “Remove->AU12”.