A Simple Example
In this example, we will use very basic geometry so that the focus is on how to use the BCS. The base shape is a plane. The weight moves the vertices as if the plane is rotated.
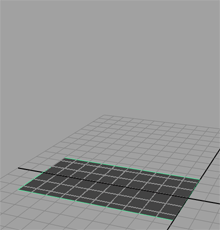
Here is an image showing the path that the front vertex takes. As you can see, its movement is linear.
From the example scenes you downloaded in 3.1 First Steps, open the scene
bcsIbt_start.maIt contains a scene with a plane
basethat already has a BCS setup with one weightA. It deformsbaseas if it was rotating 90 degrees on its z-axis. An inbetween will be used to create a more arc-like movement.Open the bcsUI (press the shelf button or execute the MEL statement
DPK_bcsUI;).Double-click the weight
Ain order to expand it and see its weightPositions.
At the moment, it just has a position at 1, so let’s create an inbetween position at 0.5 now.
Open the “Create Weight/WPos” UI section, enter 0.5 as position under “Create Weight Position” and press the Create button.
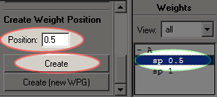
A new weightPosition at 0.5 will appear in the weight list.
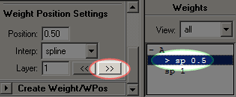
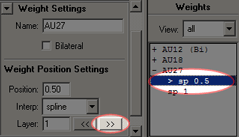
With the 0.5 wPos selected, press the ‘>>’ button in the “Weight Settings” UI section to place the wPos on layer 1.
Most (if not all) inbetween positions work better when on a sub-layer. This topic is a bit complicated, but if you want more information, see 5.4 WeightPosition Layers.
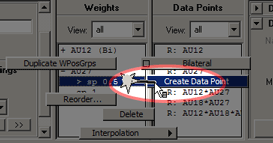
With this wPos still selected, do a “right-click->Create Data Point” and model the new geometry to create a more arc-like movement.
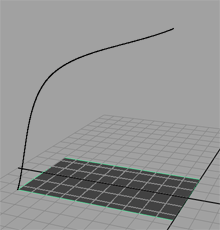
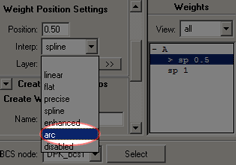
Even though this movement is fluent, it does not look like the plane is rotated. This can be solved with a different interpolation of the weightPosition.
Choose “arc” interpolation for the inbetween wPos at 0.5.
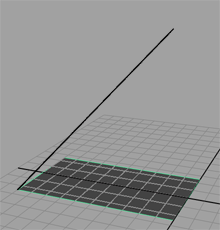
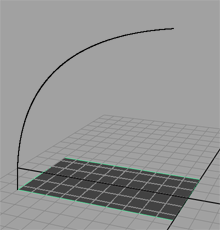
The result is now much more arc-like:
The finished setup with arc interpolation can be found in the scene
bcsIbt_finished.ma
A More Detailed Explanation
An inbetween in BCS and Blend Shape terminology is a shape that is reached between the extreme values of a weight. For more information, see 5.3 Inbetween Basics: WeightPositions.
Creating an inbetween in a BCS setup involves the following steps:
Defining the Inbetween Position
Configuring the WeightPositions
Creating a New DataPoint at the Inbetween Position
Modeling the Inbetween Geometry
Defining the Inbetween Position
Inbetween dataPoints are created with a certain weightPosition or a combination of different weightPositions—just like any other dataPoint. For inbetweens, this means that you have to create a weightPosition on a weight’s value that lies between 0 and 1.
This is done by selecting the weight and creating a new weightPosition using the “Create Weight/WPos” UI section.
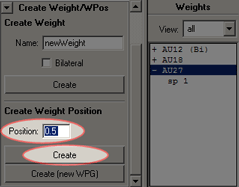
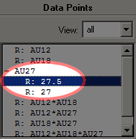
In this image, we are about to create an inbetween weightPosition for weight
AU27 on its value 0.5.
Configuring the WeightPositions
Since most inbetweens don’t introduce completely new movements but instead alter the main movement created by the dataPoint on position 1, inbetween dataPoints should be “relative” to the otherwise linear main behaviour. This can be achieved by placing the inbetween weightPositions on a sub-layer.
To do this, simply select the inbetween weightPosition and press the ‘>>’ button in the “Weight Settings” UI section:
You can also tweak the transition behaviour by selecting different interpolations for the weightPosition.
Creating a New DataPoint at the Inbetween Position
This is as easy as creating other dataPoints. Choose the desired position by selecting the appropriate weightPositions and do a “right-click->Create Data Point”.
Modeling the Inbetween Geometry
Upon creating the inbetween dataPoint, the BCS has already created the geometry you can use to model it. In the UI, you can find the dataPoint in the dataPoint list under its dataPoint group. You might have to double-click the group in order to expand it and see the dataPoints. Use the menu item “Data Points->Rebuild DataPoint Name” to convert the names of dataPoints so that they include information about their position.