Download the Example Scenes
Please download the following example scenes in order to follow this
tutorial:
https://www.stargrav.com/bcs/scenes/bcsGettingStartedScenes.zip
Creating Your First BCS Node
Open the scene
bcsSteps_start.maYou will find a polygonal head object with a neutral facial expression (
head) and three other heads with a “mouth open” (AU27), “smile” (AU12) and “purse lips” (AU18) shape.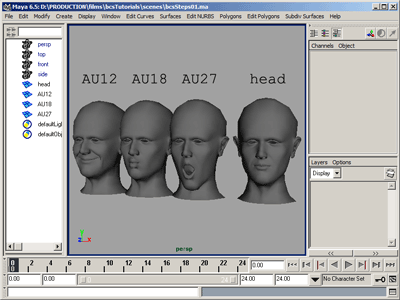
Open the BCS user interface by executing the MEL statement:
DPK_bcsUI;If you have a shelf button with this statement and don’t want to type MEL commands, you can press it instead.
Select
AU27and thenhead.In the bcsUI, use “New BCS->Create BCS” to create the BCS deformer node with
AU27as first target.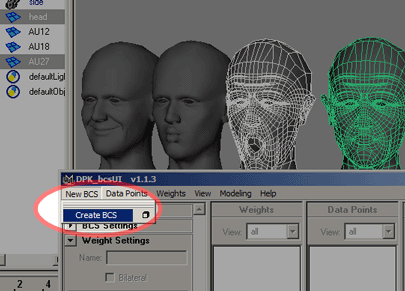
Note The term “target” is not really applicable for BCS setups. It is just used for easier understanding since these simple weight/dataPoint relations behave like Blend Shape targets. |
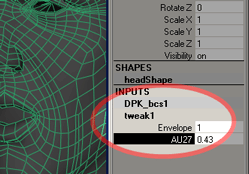
You can now select the head object and click on DPK_bcs1 in the
Channel Box in order to see the weight attribute for AU27.
Adding the Remaining “Targets”
Instead of selecting just AU27 and head, you could have selected
all three targets and head before creating the BCS node. The result
would have been that all three targets were already added to the setup.
But now, we will use the remaining two objects to show how to add targets to an existing BCS setup.
Select the objects
AU12andAU18.In the bcsUI, use “Data Points->Add Selected Objects” to create two more weights for these shapes.
Delete the three (dataPoint) objects
AU12,AU18andAU27from the scene. You can always bring them back by double-clicking their dataPoint in the dataPoint list.
If you want, you can bring the weights into a different order. For more information, see Reordering Weights.
The First Combinations
AU18 and AU27
When you set the weights AU18 and AU27 to 1, you’ll see that
they don’t mix very well.
The mix of AU18 and AU27 is very important for “Ohh” and
“Uhh” sound shapes, so let’s create a combination for correcting this mix.
In the bcsUI, select the weights
AU18andAU27and do a “right-click->Create Data Point”.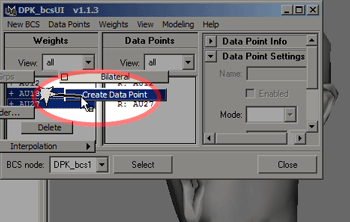
A new dataPoint will appear in the dataPoint list and a new object will be in the scene.
Move the new object
AU18_AU27to the side so that you can see it better.You can now start moving vertices of
AU18_AU27until you’re satisfied with the result. Be sure to constantly check how the head deforms when going from justAU27orAU18to the combination.
As it is more efficient to work on just one side, you can use Mirror Geometry to copy your edits on one side over to the other side. It has a short section in this Getting Started chapter in 3.3 Using Mirror Geometry. You might also want to look into the other helper tools, such as Paint Deform and Toggle View for optimizing your workflow.
In case you don’t want to model yourself now, simply follow these steps:
Delete the
AU18_AU27object.Import the scene
bcsSteps_AU18x27.maSelect the imported object
AU18x27In the dataPoint list of the bcsUI, select the dataPoint
AU18*AU27.Choose “Data Points->Connect Object->Absolute”.
Delete the object
AU18x27from the scene.
The result should now look similar to this:

AU12 and AU27
For the combination AU12*AU27, you can proceed just like explained
above. The finished combination shape can be imported from the file
bcsSteps_AU12x27.ma
AU12 and AU18
This combination is particularly suitable for demonstrating “Tweak Mixing”. For an even more advanced and powerful setup technique, see 4.6 Making Use of the ACS.
Create the combination dataPoint of
AU12andAU18.Delete the created object
AU12_AU18from the scene.With the dataPoint
AU12*AU18selected in the list, choose “Extras->TweakMix…”. A new window will appear where you can “remix” the dataPoint.Set the slider for
AU12to about 0.75 and the slider forAU18to about 0.666.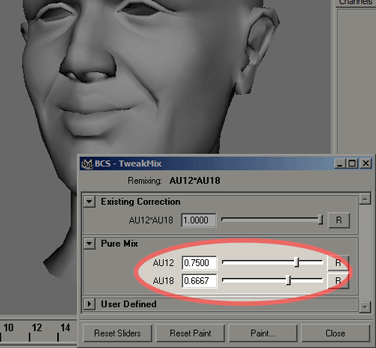
Delete the object
AU12_18from the scene.
AU12*AU18*AU27
Not all combinations of weights that don’t look good have to be accounted for in a BCS setup. Which combinations should be created depends on the facial expressions the character needs for his performance, the personality of the character and not least on the budget (setup time) of the project.
You can therefore decide for yourself whether this three-weight-combination is necessary or whether you can get away with letting the animators be careful how they animate your setup.
In any case, the scene bcsSteps_AU12x18x27.ma contains this
combination shape, so that you can use the workflow described above to create
this combination dataPoint.
Automatic Left-Right Separation
You can let the BCS create separate left and right versions of your modeled
target shapes. We will now demonstrate this with AU12.
If you want to skip the above steps, open the scene
bcsSteps_startLeftRight.maOpen the bcsUI (press the shelf button or execute the MEL statement
DPK_bcsUI;).Select
AU12in the weight list and do a “right-click->Bilateral”.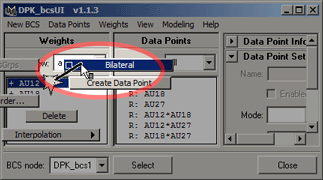
Select the BCS node to see that there are now two values for
AU12. If you use one of them, you can see that the left-right separation is already working.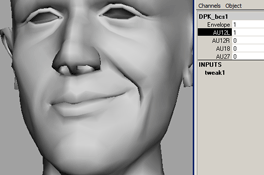
You can tweak the falloff that is used to separate the two halves. To do this, select the—now bilateral—dataPoint
AU12and open the falloff settings.
There is a list of falloffs that is independent from the list of dataPoints. Each bilateral dataPoint can use one of these falloffs.
Note
When several dataPoints use the same falloff, editing this falloff will affect all these dataPoints. This can lead to unexpected results if you’re not aware of this fact.
Choose the falloff that seems best suited for separating this dataPoint. For example, choose falloff “mid”.

In order to avoid any unexpected side-effects when editing the falloff, you should copy this falloff so that only the dataPoint
AU12uses it. To do this, simply click the Copy… button beneath the falloff controls and enter a name, e.g. “AU12”.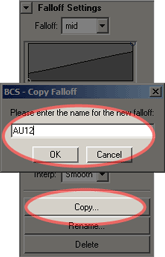
With this independent falloff, you can safely try editing the actual falloff curve to enhance the separation.
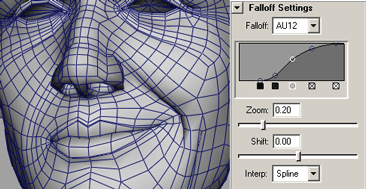
Note that the result of editing the falloff is subtle here since the “mid” falloff wasn’t that bad in this case.
The last step is to assign this falloff to the remaining bilateral dataPoints. Select the four combination dataPoints and choose “AU12” from the falloff drop-down list.
Image
Ashows what happens when the tweaked “AU12” falloff is assigned to the dataPointAU12and the combination dataPoints still have the “mid” falloff. In imageB, the bilateral dataPoints use the “AU12” falloff too.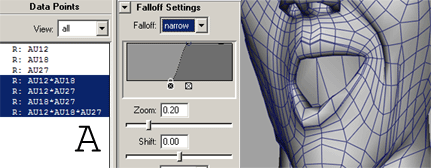
For manual vertex-level control over the left-right separation and/or to create differing left and right versions, see 3.4 Tweaking the Left-Right Separation.
Conclusion
The result of following this tutorial can be found in the scene
bcsSteps_finished.ma
You’ve now learned how to use the most important features of the BCS. On the next pages, some of the other functions are presented with basic information and little tutorials, which build upon the knowledge you’ve acquired here.