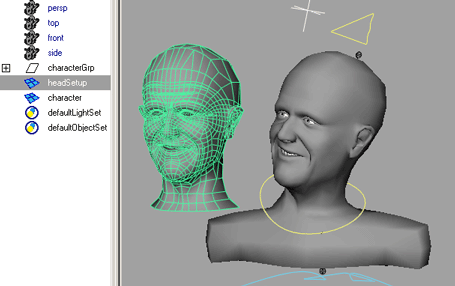
Attaching the Head to the Body
The typical method for attaching the head geometry to the body in a Blend Shape setup will not work with the BCS. Among other things, this has to do with the flexibility to re-create target geometry. This typical workflow I’m referring to is as follows:
Separate the head from the body.
Create the Blend Shape targets as separate head objects.
Re-attach the head to the body, merge vertices, soften normals and delete history. The head object has to be selected first when doing the combine operation.
Select the target objects and then the full body and do a “Deform->Create Blend Shape” with Check Topology turned off.
The recommended method for attaching a head with a BCS setup to the body geometry is as follows:
Separate the head from the body.
Create and keep a copy of the head object—let’s call it
headSetup.Re-attach the original head to the body, merge vertices etc., just like above.
Select the
headSetupand then the full body and do a “Deform->Create Blend Shape” with Check Topology turned off.Select the new Blend Shape node and set the only weight to 1.
Create a complete BCS setup on the
headSetupobject.Hide the
headSetupobject when it is not needed.
The example scenes you downloaded at the beginning of 3.1 First Steps contain two
scenes that demonstrate this method. The scene bcsAttach_start.ma
contains an initial object from which the head needs to be separated. A
scene prepared with the above method for separating the head from the body can
be found in bcsAttach_finished.ma. Please note that it is just a
proof-of-concept and therefore has minimal work put into those parts of the
setup that are not related to the face.
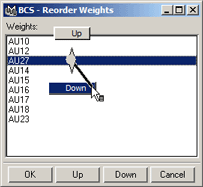
Reordering Weights
New weights are always added at the end of the list and will appear as last weight in the Channel Box. You can reorder these weights at any time with a “right-click->Reorder…” in the weight list of the bcsUI.
A new window will let you modify the order of the weights. Clicking the OK button applies the changes to the BCS setup.
Bringing Back Deleted Target Geometry
Simply double-click the dataPoint that you want to re-edit. That’s it :)
Keeping Track of Big Setups
If you take a look at the example setup (https://www.stargrav.com/bcs/scenes/exampleSetup01.zip), you will find quite a lot of dataPoints, 184 to be precise, 173 of which are combination dataPoints. The problem with these big setups is how to keep track of all the combinations and inbetween combinations.
The BCS has several helpers for these situations:
The so-called view modes of the weight and dataPoint lists.
The CTRL+right-click marking menu of the weight list.
The CTRL+right-click marking menu of the dataPoint list.
Using these helpers in certain ways allows you to quickly get an overview of which dataPoints belong to which weights and how a certain weight is combined with the others.
Finding All Combinations of a Certain Weight
Set both lists to all mode.
Select a weight in the weight list.
Hold down CTRL while clicking the right mouse button in the weight list and choose Select Related DPs.
Set both lists to related mode.
The weight list will now show only those weights that have a combination with the initially selected weight. The dataPoint list will show all these combination dataPoints.
You can now select a different weight in the list and do a “right-click->Select Related DPs” once more. This will select all dataPoints that use both weights.
Paint Deform
When modeling a combination dataPoint, it is often useful to create some Paint Deform objects, so that you can quickly copy structures of certain dataPoints with related deformations. For more information, see Chapter 8. Paint Deform, 8.4 The PaintDeform Marking Menu and the menu item of the Data Points menu Add to PaintDeform Marking Menu.
DataPoints to consider for the Paint Deform Marking Menu are:
The unmodified combination itself.
DataPoints that are part of the deformation. For example, when modeling the combination
AU12*AU27, you might want to useAU12andAU27as Paint Deform Targets.Other dataPoints with a similar deformation. For example,
AU12*AU27can be useful when modelingAU14*AU27.You can even TweakMix the combination you’re modeling and duplicate certain shapes while mixing, so that you can use them later as Paint Deform Targets.