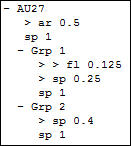
The left list contains the weights and weightPositions of the bcs node. You can expand and collapse a weight in order to show/hide the weightPositions that belong to it.
Move the mouse cursor over this image to expand the weight.
To expand or collapse a weight, simply double-click it. Another way to do this is to use the view popup menu in the weight list. It has entries for expanding and collapsing all or just the selected weights.
When a weight is bilateral, ‘(Bi)’ is added after its name.
The weight t2 in the above image is bilateral. Weight positions are
shown with their layer, their interpolation,
and their position. A layer of 1 is indented with one
>, a layer of 2 is indented twice, etc.. The first two characters of
the interpolation are then followed by the position.
WeightPositionGroups in the List
If a weight has more than one wPosGrp, they are listed in the weight and can themselves be expanded to show their weightPositions. So the hierarchy is “weight->wPosGrp->wPos”. The first wPosGrp of a weight is omitted to reduce list entries.

In this image, the weight AU27 has 7 weightPositions in three wPosGrps.
The main group contains two weightPositions, the first of which is at 0.5, has
arced interpolation and is on layer 1.
Marking Menus
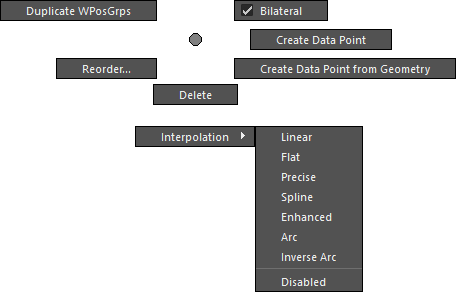
The weight list has two marking menus. The right mouse button brings up the editing menu. Pressing the right mouse button while holding CTRL shows the view menu. These will greatly speed up the work with weights and weightPositions.
Note The view menu was previously opened using the middle mouse button. As this doesn’t work in Linux, CTRL+right-click is now used instead. On Windows, the old middle-click behaviour is still supported but is considered deprecated for consistency’s sake. |
Weight “Edit” Popup Menu
Open this marking menu in the weight list by holding down the right mouse button. Items that are not explained here are explained in the menu section.

Click an item on the image to jump to its description.
Bilateral Check Box
Toggles the bilateral state of the selected weights.
Create Data Point
Creates a new dataPoint at the selected position. See the description of the Create DataPoint button.
Create Data Point from Geometry
Like Create Data Point, but uses the selected object instead of creating a default one. See also the Create from Geometry button.
Interpolation
Changes the interpolation of the selected weightPositions. If no wp is selected but a weight is, all its wps are edited.
Weight “View” Popup Menu
Open this marking menu in the weight list by holding down the right mouse button while pressing and holding the CTRL key. Items that are not explained here are explained in the menu section.

Click an item on the image to jump to its description.
Expand/Collapse
These items will expand or collapse the selected weights. This is useful when you want to see the weightPositions of, say, five weights without expanding all weights or doing five double-clicks.
Select Included DPs
This will select all dataPoints in the dataPoint list that have all of the selected weights or weightPositions in their position. Note that when a dataPoint isn’t visible in the view mode of the dataPoint list, it can’t be selected.
Select Related DPs
This will select all dataPoints in the dataPoint list that have any of the selected weights or weightPositions in their position. Note that when a dataPoint isn’t visible in the view mode of the dataPoint list, it can’t be selected.
List Modes
Above the weight list is a drop-down menu where you can specify the mode of the list. This mode defines which weights should be displayed. This is very useful when the setup gets bigger and you want to focus on just the weights you’re working with. Here is a description of the view modes:
all
Displays all weights of the bcs node.selected
Shows only those weights that are selected in all mode.related
Shows only the weights that have something to do with the dataPoints that are selected in the all mode of the dataPoint list.validOnly
Same as in related mode, but only shows the WPGs that are used by the selected dataPoints.
Hint To quickly see how a certain weight is implemented into the current setup, follow these steps:
The weight list now shows all weights that have a common dataPoint with the originally selected weight and the dataPoint list shows all these dataPoints. When you now select one of the other weights that are currently shown in the weight list and do a right-click and choose Select Related DPs, all dataPoints that have the originally selected and the newly selected weight in their position will be selected. |